

Custom Printed Glass & Acrylic Splashbacks
Digital UV Printed glass or acrylic splashbacks create a beautiful and inspiring focal point for kitchens, bathrooms and commercial or residential interiors. With digital images printed directly onto the back of the glass, you have the opportunity to transform the look of your kitchen or bathroom plus have the added benefit of having a splashback as well as a fantastic piece of art on the wall and if you use your own images it will be truly unique and there are no grout lines to discolour.


Tailored Printing uses only 6mm Toughened Starfire Glass or high-quality clear cast acrylic for our digitally printed splashbacks. All edges and cut-outs are safety polished for clean handling and finish.
We offer both professional installation and DIY options to suit your project needs.
The Benefits of a UV Printed Splashback
More than just good looks - UV printed splashbacks bring lasting value to your kitchen or bathroom.
Vibrant,
Long-Lasting Colours
UV printing delivers sharp, high-definition images with rich, vibrant colours that resist fading over time. Because the ink is cured instantly using ultraviolet light, the result is a durable and colour-true finish that looks as stunning years from now as it did on day one.

Custom Designs,
Limitless Possibilities
Whether it’s a calming coastal scene, abstract art or your own photography, UV printing makes it possible to turn virtually any image into a splashback. With the flexibility to print directly onto glass or acrylic, your space can be completely personalised to reflect your style.

Easy to Clean
& Built to Last
UV printed splashbacks are not only visually striking—they’re also tough and practical. The cured ink bonds directly to the surface, creating a smooth, non-porous finish that’s resistant to moisture, heat, and stains. Just wipe clean—no scrubbing, no hassle.
Splashback Design Examples

Abstract Gold Leaf

Brick Wall

Geometric Pattern

Rainforest and Waterfall

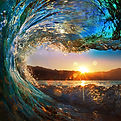
Ocean Horizon

Grunge Steel

Apartment Skyline

Oil Slick Colours

Black Leather
Supplying your own Images
You’re welcome to provide your own image for a custom glass or acrylic splashback. For best results, we recommend JPEG, TIFF or EPS files at 300dpi - ideal for splashbacks up to 2500mm x 1250mm. Smaller files may still work for smaller sizes. Extra charges may apply for image editing.
Not sure if your image will work? Email it (along with your splashback size) to info@tailoredprinting.com.au and we’ll check it for you - we’ve even had great results with iPhone photos!
Please keep in mind:
-
Images will often need to be cropped to fit your splashback size.
-
Think about layout, orientation, and the key focal point.
-
Portrait images won’t suit wide, landscape splashbacks.
-
We can help modify your image if needed.
To send large files, use platforms like WeTransfer, Hightail, or Dropbox.
Important: Images from Google or websites are usually low quality and may be copyrighted - these are not suitable.
Need help finding an image? Try www.shutterstock.com. Shutterstock has an endless range of high quality images and photos available to purchase. Just share the image ID with us and we’ll check if it’s print-ready and suitable for your project!

How to Measure Your Splashback
Getting accurate measurements is key to a perfect splashback fit. Follow these simple steps to ensure your design and installation go smoothly.
Step 1: Check the Size Limits
Our UV printing equipment can handle pieces up to 2500mm long x 1250mm high. Make sure your splashback fits within these dimensions. If your area is larger, we can split the design across multiple panels - sometimes it’s best to balance joins based on the image.
Step 2: Measure the Area
Use a tape measure to get the width (left to right) and height (top to bottom) of the splashback area. For quoting, approximate sizes are fine - but for manufacturing, we’ll need exact measurements. Contact us to request a free graph pad to help you sketch everything clearly.
Step 3: Note Cut-Outs and Features
Draw in and clearly mark any of the following:
-
Power points
-
Taps or plumbing
-
Range hood cut-outs
-
Notches or cut-outs around cabinets or ledges
The more detail you include, the better! If needed, feel free to email us photos along with your sketch.
Step 4: Consider Material Differences between Glass and Acrylic
Glass Splashbacks must be cut precisely before toughening. No changes can be made once toughened, so accuracy is critical.
Acrylic Splashbacks can be cut or drilled on-site. These are a little more flexible, especially for tricky spaces.
Note:
-
Any holes or cut-outs must be at least 50mm from the edge of the glass.
-
We allow a 2mm expansion gap around all edges—please give us the true wall-to-wall measurements.
Step 5: Special Sections
If you’re adding a narrow piece below a window ledge or a return around a corner, this will be made as a separate piece and must be at least 50mm in height.
Step 6: Final Touches
Your image can be printed edge-to-edge and carried seamlessly across multiple panels or corners -just let us know your layout preference.
If you opt for professional installation, we’ll visit your site for a final check measure before production. This will happen once your order is confirmed and a 50% deposit is received. The remaining balance is due before pick-up, delivery, or installation.